Testing NodeJS with Jenkins
NodeJS is awesome. I’ve used it for many pet projects and have worked on commercial projects which have made good use of Node in sticky situations. When it comes to testing Node, we’re spoiled. My favourite testing framework is Mocha and my favourite testing library is should.js. We’ll be using that alongside Jenkins to build an automated test suite for our demo repository.
You Will Need
Mocha
Mocha is our testing framework. We use it to describe the tests we want to make.
Should.JS
Should.js is our assertion library. We use Should to check something is as expected. We use should.js within the context of Mocha to decide whether the test has passed or failed.
Ant
We use Ant to set up and prepare the environment for a test. We run Mocha inside of ant and return the result. The advantage of using Ant is that you can also run the same test you’re running on Jenkins on your development machine.
Jenkins
Of course, we also need to run Jenkins. As well as Jenkins, we’ll also need a few plugins:
Git
We’re going to use Git to track the changes in our code, and to “tag” the latest passing build. That way, we know what builds we can use in production. We could even get Jenkins to push the code onto our web server later if we wanted to (if you want me to write about that just ask!).
A Server
Anything will do really; the faster the server the faster the tests will run. I will use a Debian-based distribution (such as Ubuntu) for the purposes of this article. I’d recommend you use a dedicated machine (not necessarily a dedicated hosted server!) to run your builds if you have the capacity, as testing could be rather processor intensive (less-so for testing node; more so for compiling statically typed languages), but it all depends on your situation and what your NodeJS code is doing.
Installation
Install The OS
The first thing it to install your distribution of choice (I’ll be using Ubuntu) on your server if it isn’t already. There are a million articles online explaining how to do that, so pick one and go for it. If it’s the first time you’ve installed a linux distribution, you might be surprised at how simple it is! While it’s installing, move on to the next step…
Generate SSH keys for your git repository
You’ll need an SSH key for your Git Repository.
Install the SSH keys for your Git repository on your server
One way to do this (there are a few ways) is to use scp. scp is simply cp over
ssh. If your private key is called jenkins_rsa, then you might run a command
like this:
scp ~/.ssh/jenkins_rsa ubuntu@server.com:~/.ssh
Install git on your server
Assuming you’re using a Debian-based distribution, you can install git with:
sudo apt-get install git-core
Install Jenkins
The best way to do this is to follow Jenkins’ own tutorial on this, to ensure you have the latest version. The tutorial for installing Jenkins on Ubuntu is here.
Install NodeJS & NPM
Depending on what version of node you want to run on your machine, you’ll need a different version of node and NPM. If the version you want isn’t the same as the version your distribution carries, you’ll want to use a version manager. There are quite a few tools for this - n, Nave and nvm are popular examples, which each have their upsides and downsides. Choose whichever one works best for you. For the purposes of this article I’ll assume the default one works fine for your application:
sudo apt-get install python-software-properties
sudo add-apt-repository ppa:chris-lea/node.js
sudo apt-get update
sudo apt-get install nodejs npm nodejs-dev
Install Mocha
We need to install mocha globally so we can run it from any directory. We do this by running:
sudo npm install -g mocha
Install Apache Ant
sudo apt-get install ant
Configuration
Configure Git
You need to identify the build server so that it can push those tags. First-off, you need to git the server a name and email address:
git config --global user.email "you@example.com"
git config --global user.name "Your Name"
You need to do this so that github or bitbucket will attempt to authenticate you. The name and email should be the same as the name and email used on the github or bitbucket account that the SSH key is associated with.
Configure the project
Assuming you’ve built your unit tests already on your development machine, the
only thing left to do is to build an ant script to allow us to configure the
environment before and after the test is ran, using a build.xml file in the root
of your codebase. Luckily, I have one prepared! You can add in other <target>
elements which can describe any preparation you need to make before or after
running your tests, by adding them to the depends attribute’s list in <target name“jenkins” />= at the bottom.
<?xml version="1.0" encoding="UTF-8"?>
<project name="My Project" default="build" basedir=".">
  <target name="init" description="Create build folder and subfolders if required">
      <echo message="Creating Directories..." />
      <mkdir dir="build"/>
      <mkdir dir="build/testResults"/>
  </target>

  <target name="cleanup" description="Remove cruft generated from testing">
    <echo message="Cleaning up..." />
    <delete includeemptydirs="true" failonerror="false">
      <fileset dir="/tmp/node_modules/">
        <include name="**" />
      </fileset>
    </delete>
    <delete includeemptydirs="true" failonerror="false">
      <fileset dir="build/testResults">
        <include name="**" />
      </fileset>
    </delete>
  </target>

  <target name="mocha-jenkins" description="Test framework">
    <echo message="Installing Deps ..." />
    <exec executable="npm" failonerror="true">
      <env key="NODE_PATH" value="/tmp/node_modules/" />
      <arg value="install" />
    </exec>
    <echo message="Running the tests ..." />
    <exec executable="mocha"  output="build/testResults/mocha.xml" failonerror="true">
      <env key="NODE_PATH" value="/tmp/node_modules/" />
      <arg value="--reporter" />
      <arg value="xunit" />
    </exec>
    <echo message="Tests done" />
  </target>

  <target name="jenkins" depends="cleanup,init,mocha-jenkins" />
</project>
You can see above that we make three directories: build, build/testResults,
and /tmp/node_modules. These are where mocha’s test results are stored.
They’ll be used later by Jenkins to determine the result of the test.
The <env> tags are used to define where our global node modules are. It’s
important we move this to somewhere where jenkins has permission. The tmp
directory is as good as any!
Configure Jenkins
Now that we have the server all set up, and an ant script ready and working, we need to configure Jenkins to be able to run our tests and report the results. To do that we’ll install the following plugins:
After logging in to the webUI, You install them by Going to Manage Jenkins –>
Manage Plugins -> Available and searching for them in the list.
Once they’ve been installed, Jenkins will restart.
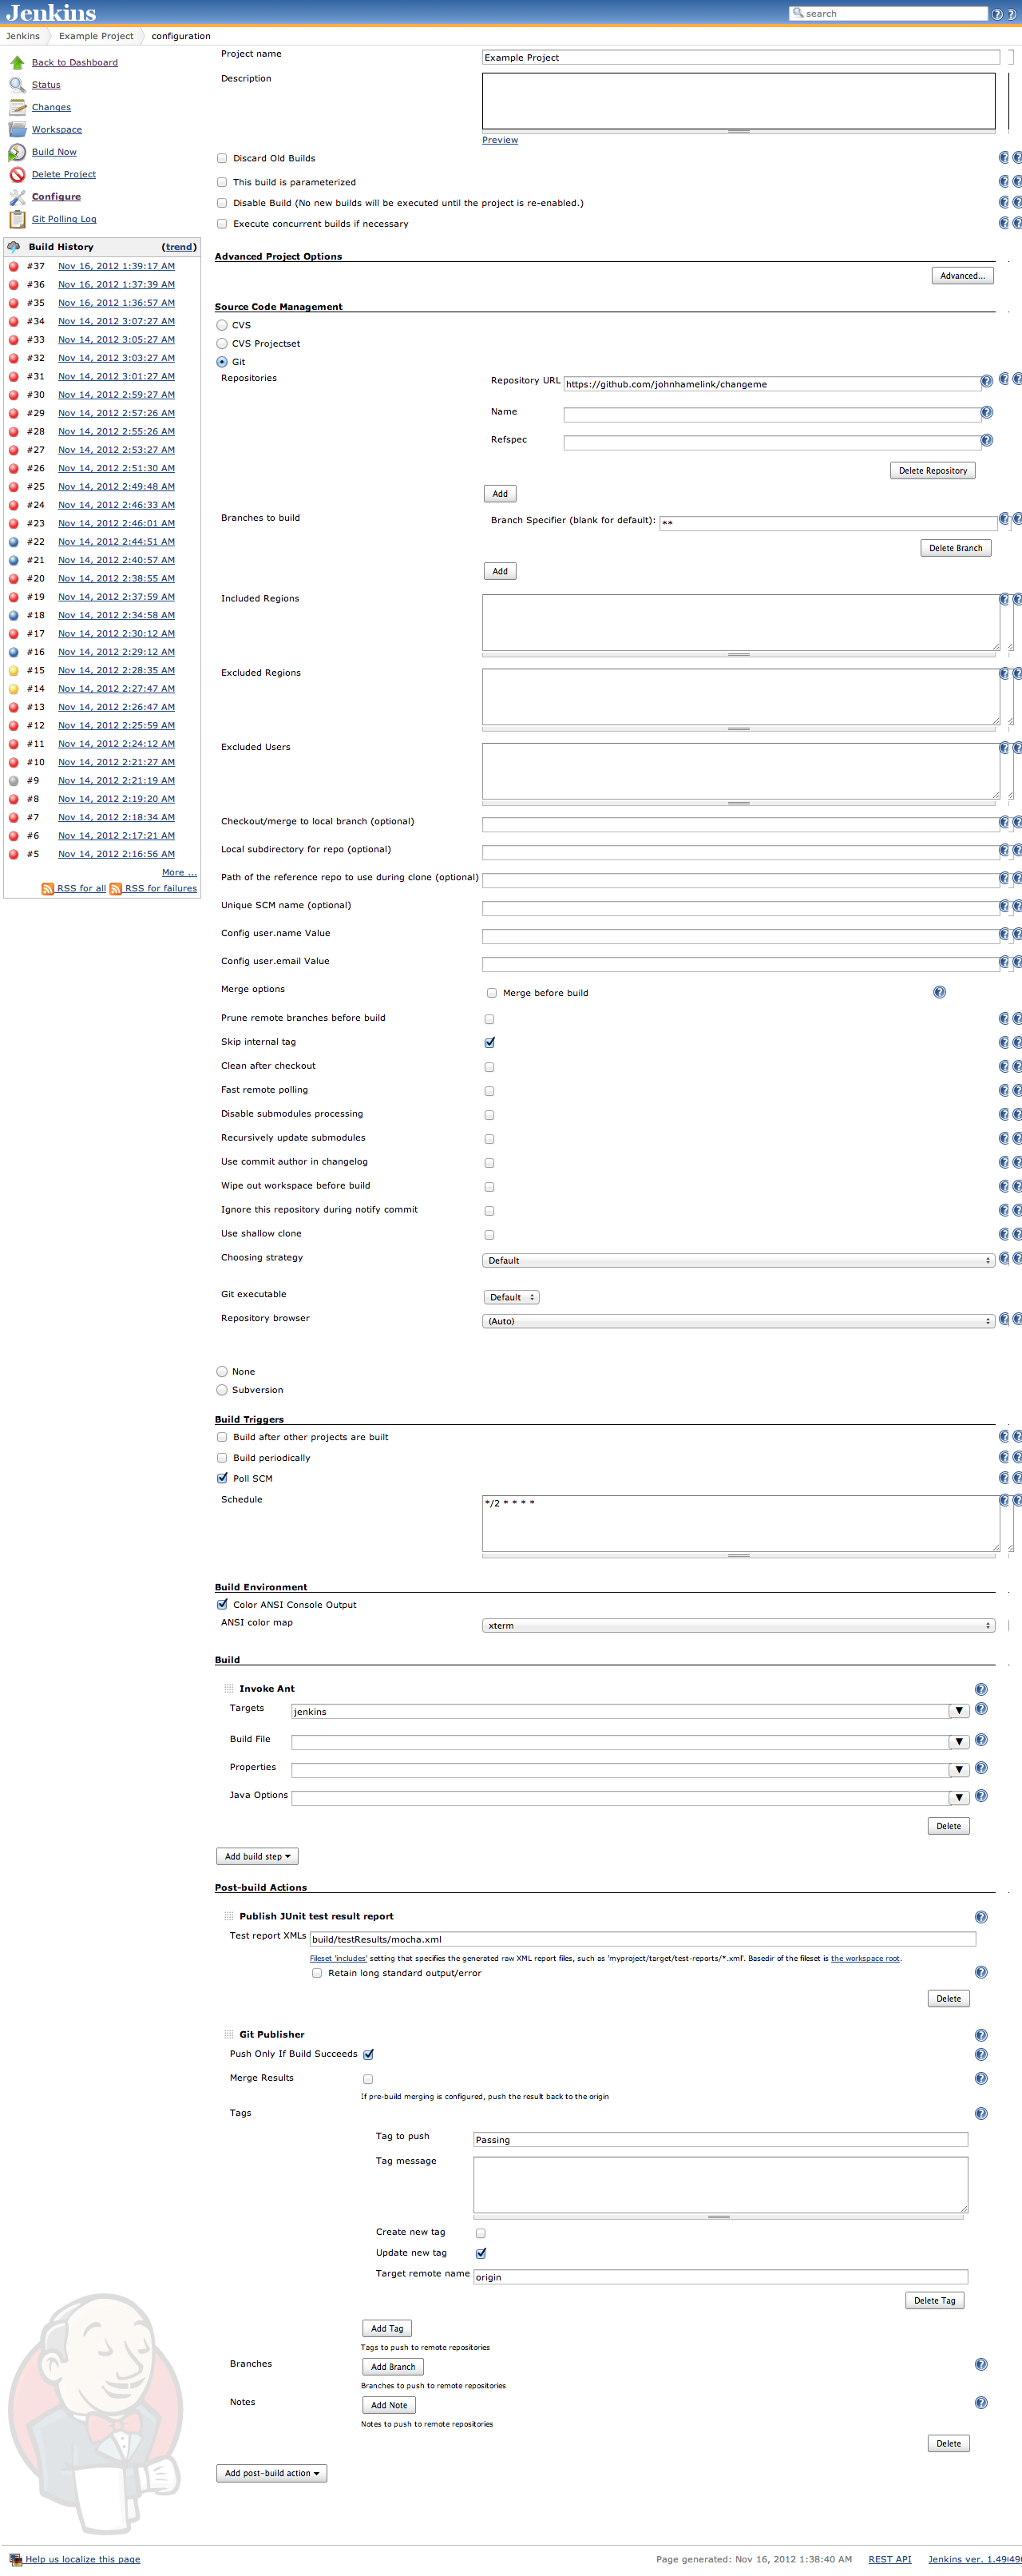
Now we need to create a new “job” to run our test within. You need to click on
New Job, then give it a name and select Free-style software project. For
speed, here’s an image of my setup (I’ve expanded all the “advanced” buttons to
show all of my settings):
To setup jenkins to read your mocha test result, click on “post-build action” then select “Publish jUnit test result report”, then fill in as the image describes.
Well done, Jenkins is configured!
Try it out
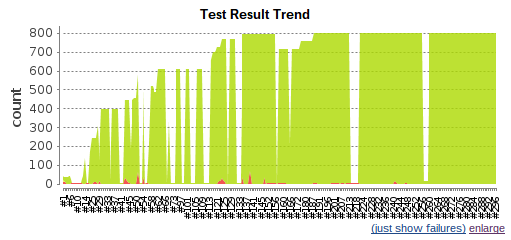
Now all you have to do, is test the build. We can do this within Jenkins by Clicking the “Build Now” link on the left hand side of the page. It should pass (or fail, depending on how good your code is!). If the build passed, it should have pushed a Tag onto the latest revision. If it passed or failed, you should now see a graph in the project page.
A test result graph. The red is failed builds. Happily, there isn’t much red.
You’re done! You can extend your config to alert you in different ways, run other jobs when builds pass, and many other exciting things. I’ll be writing about getting other things working under Jenkins soon.
Over and out!